Tuesday, December 27, 2016

Adore You | D-lish Scraps

Hi Everyone! I hope you've all had a wonderful Christmas, and are still enjoying time with family. We had a crazy busy but very enjoyable day with most of our extended families, then it was straight back to work for me today! No rest for the wicked hey?

Today post involves a little end of the month D-lish Inspiration, inspired by this months Inspiration Board, and using the current Just Add Paper kit - Peaches & Cream


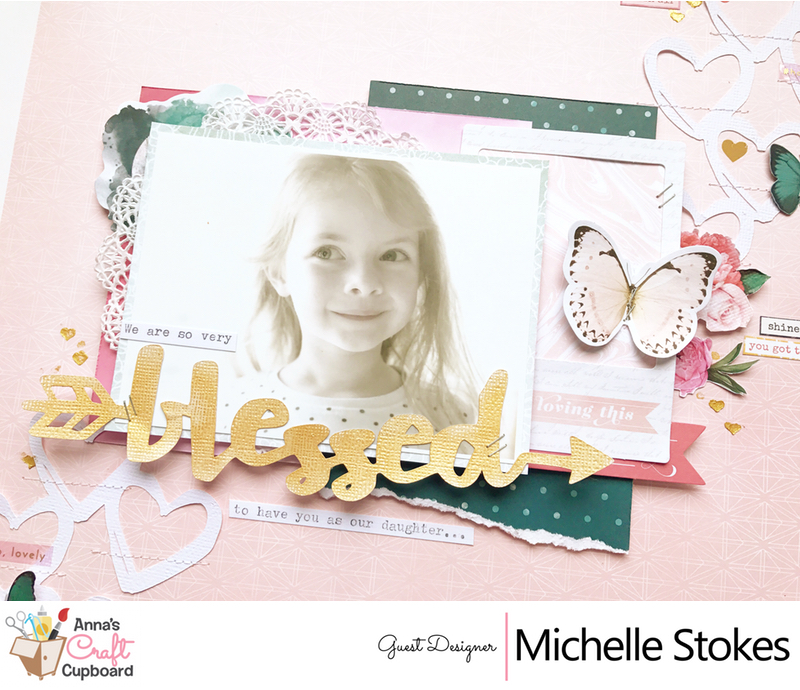
Love this photo of Leila, taken back in 2011 when she was just shy of 7 months. That little face, and those big blue eyes! 

Before I share the full layout, here's a closer look at the board and the contents of the kit.


The contents of these kits are so well co-ordinated, it's so hard not to use everything all at once on one layout! 

I've gathered a few items from the Cocoa Vanilla Studio Love Always collection as they had a similar colour scheme to the kits, and suited the floral themes on the Inspiration Board. I also love that Amanda has included cute flower die cuts within this kit. Perfect addition to the collection of embellishments on the page

I gathered most items to the right of the photo, including the title. I kept the wood veneer raw as I felt there wasn't a need for any extra colour added to the layout

Simple mini cluster made from Journal It's, paper flowers and some torn patter paper thats also under the photo

And lastly a touch of journalling to finish the layout off.

Thanks so much for stopping by today! Be sure to share your creations using D-lish Scraps products/kits within our Facebook group - The Scrap Suite. We also have a link up tool over on the right side of the blog for Inspiration Board layouts to be entered into our monthly draw, and theres also an album within the Facebook group if you would like to enter them there too.

Until next time, Happy Scrapping.
And have a very safe and Happy New year!!

Friday, December 23, 2016

Christmas Tags | The Cut Shoppe

Hello Festive Friends! I hope you're all enjoying the lead up to Christmas Day. I can't believe that theres only 2 more sleeps until the Jolly man arrives and leaves presents under the tree! Speaking of presents, are you all sorted? As I write this up I am not. However I do have plans to head out soon and finish the last of it so I can wrap them up all pretty using some simple brown paper and these fun and festive tags. 

I've used a mix of Christmas designs from The Cut Shoppe store, along with an old Heidi Swapp Christmas collection I've been hoarding since its release. I love how they've turned out, and can't wait to gift them on to those we love this Festive Season.

Here's a look at the design sets I've used. The Magical Christmas set is one of our FREE designs this month. You can find it HERE

       
Tinsel Town                                        Tree Farm

       
Magical Christmas                             Out of Line Alpha

All these tags were super easy to create, and came together quite quickly.

I started with a plain tag for the base, then layered a few pieces together including a doily or ephemera piece and stapled or sewed into place 

I used a mix of white cardstock, pattern paper and glitter papers to cut the designs out

This cut file design I kept almost complete by sewing the holly leaf to the base and folding it upwards for dimension

I also used a mix of different ribbons and threads for the tops of the tags, more for decoration than to hang off the present. I can always tuck the tag into a ribbon around the present if needed

I made sure to make the most of the pieces cut out, including the negative piece of the snowflake circle. All 4 of the circle designs from the Magical Christmas Set can be used either way 

For the tags above I incorporated some twine and a bow with the gold reindeer silhouette piece, and the Letter F on the right has been used to identify that tag for a certain little person in our extended family.

Lastly these two I kept quite similar, using pattern paper under the cut file then sewing around the edge and hanging together with a tag. 

And here's one last look at a few presents already under the tree. I really like the simple look brown paper gives a present, enabling the hand made tags to stand out for all to see.

Thats all from me today, I hope this has inspired you into making your own handmade tags this Christmas. Thanks so much for stopping by. See you in the new year!
Have a Safe and Merry Festive Season!

Michelle x

Monday, December 12, 2016

Merry Christmas | D-lish Scraps

Hi Everyone! I have a new D-lish Scraps layout to share with you all, featuring the special edition Just Add Paper kit - Festive Wishes. Absolutely LOVE the colours within this kit, steering away from the traditional Green & Red. So much prettiness that I'm not surprised how quickly they sold out! 

Here's a quick peek at what the kit included..


And here's the layout I created with it..

It took me a few days to get this page sorted out after starting, as I've come down with a hideous virus that I just can't seem to shake. Seeing all the pretty D-lish goodness has seemed to cheer me up, however I'm headed back to bed once I get this post sorted! 

I kept the layout design quite simple, focusing mainly on the products within the kit, including the twine and tag from the packaging. I also added a magnolialace doily and some enamel stars and dots from my D-lish stash to compliment the kit items.


I started with a strip of torn glitter washi tape along the middle of the page, then layered the photos with some vellum and the doilies and popped them up on foam.


Next I altered the 'Merry Christmas' piece with some Silver metallic embossing powder to be used as my title. To the right of the title I've created a large cluster using pieces from the kit (Paper & silk flowers, journal it spots, sequin heart, flair button, resin present & flower, and the twine from the packaging) along with a Magnolia and enamel dots & star from the shop, plus a cardstock star I had on my desk.


My second cluster top left is made from the packaging tag, flowers, sequin and veneer star from the kit, plus a few extra enamel dots and a star.


Next up, some quick journalling using my typewriter.. really hoping Santa brings me a new one! Not sure how much longer I can go with a broken tape reel


Lastly I've used the journal it strips layered together as a banner, with a scattering of stars and a sequin from the kit.

Thanks so much for stopping by today, I hope you're enjoying the Festive Season so far!
Until Next time.. Happy Scrapping!

Sunday, December 4, 2016

Thankful & Blessed | The Cut Shoppe

Hello Scrappy Friends! I'm back today with a new layout created for The Cut Shoppe, using the Give Thanks and I Heart String Art cut files. As we don't celebrate Thanksgiving over here in Australia,  I wasn't sure If I would be able to make use of the awesome Thanksgiving inspired designs that Ashley has released. However, I did find the perfect photo to document using the Thankful & Blessed design in the Give Thanks set.


In the last few days My Pop has been busy packing up and moving out of this house. A house that has been part of our larger extended family for over 48 years. I'm very thankful for the time we've all had growing up within these walls, and outside in the yard. The 'Thankful & Blessed' title cut file was perfect to assist in documenting the story I wanted to tell about the last gathering we shared together, before saying one last goodbye.


To create the layout I made a background using the house shape from the I heart String art file. I used the outline of the shape by removing the string art design, then multiplied and lined the houses up in rows. I cut the entire 12x12 design out and backed it with a pattern paper from a past Hip Kit, then added a few cut houses back to the page with my tiny attacher and foam tape for added dimension. 


I created a multi layer photo stack with some hidden journalling, backed the title cut file with complimenting pattern paper, and layered some painted paper houses from the same kit, on either side of the photo and title, to continue the house theme.


Lastly the addition of some enamel dots, puffy stickers, wood veneer and extra tiny staples on random houses, meant the page was complete.


Here's a closer look at the journalling. I really must replace that typewriter ribbon, or just the typewriter completely lol 


That's all from me today. I hope this has inspired you in some way to think of other ways to use the cut files. So many possibilities when you get a little creative!

Until next time, Happy Scrapping!
Michelle x

Thursday, December 1, 2016

Blessed | Anna's Craft Cupboard

Hi Again! Sadly this is my last post as a Guest Designer for Anna's Craft Cupboard. I've really enjoyed being here sharing these layouts with you all, and using this amazing collection from Pink Paislee! Thanks so much to you all for following along this week, and an even BIGGER Thank You to Briony for having me here as a guest! It's been a wonderful experience xx

Lets take a look at what I've made for this last post shall we?


I started this layout with a pattern background, as the soft pattern didn't detract from the other elements on the page. The photo I've chosen is quite similar to the one from the previous page as it was taken the same day, but was still worth documenting in the way that I have here.


Like a majority of my layouts recently, I've gone with yet another diagonal design. I can't help it! What ever works best right? I did use a few different layering pieces under the photo, including a frame, banner and clouds from the ephemera pack. 


I've also used some new Cut files from The Cut Shoppe that I felt complimented the collection and layout perfectly, with a little machine stitching for a little added detail. The title piece, not pictured here, has been altered using more of that gorgeous Gold embellishment Mousse. Its perfect to water down and use like watercolours, paint or Colour shine.  


The larger floral piece tucked in behind the photo is actually a rub on that I've fussy cut from white cardstock. The smaller floral piece and blue butterfly have also been fussy cut from one of the cut apart papers in the collection. Creating embellishments by fussy cutting designs from papers and rub ons onto white cardstock are the perfect way to stretch your embellishments out when you are running low.


Lastly a closer look at the bottom corner. You can see I've added little gold hearts around the page using a stencil and the Gold Embellishment Mousse. The Mousse has a similar texture to whipped spackle and is perfect for adding finer details to finish the layout off.

Thanks again for stopping by this week, I've thoroughly enjoyed my time creating and sharing, and hope that I've been able to inspire you all in some way. 

Until we meet again, Happy Scrapping!
Michelle xx

Products Used

Other
Cardstock, Cut file, Machine stitching 


Sparkle & Shine | Scrap The Girls

Hello!! Can you believe its December already?? 
Today marks the start of a new challenge with Scrap The Girls, and this month its a beautiful Mood Board made up of pinks and gold


I love me some pink with a touch of sparkle!
Here's what I created..


I've chosen a photo of Leila from her First Birthday Celebration back in 2011. So many precious memories from that time of our lives, and so many that I've not scrapped as yet. I went with the Love Always collection from Cocoa Vanilla Studio to create with as it has multiple shades of pinks , and so many beautiful elements within the ephemera packs that are perfect for layering.


 My main inspiration from the board was definitely the floral element, which I've created within a cluster to the left of the photo. I've also based the photo stack layers on the same colours within the clusters.


'Sparkle' and 'Shine' are from a Simple Stories chipboard pack, that worked perfect as the glittery gold element on the page.


So many pretty layers to cluster 😍 and all the heart eyes for those glitter dots!!


Another mini cluster grouped at the top of the page with a few more of my favourites from the collection


and some journalling about the day typed onto vellum and stuck down.

Lastly there is a sprinkling of gold Color Shine around the page, and some machine stitching to finish it off..

Thanks so much for stopping by, Be sure to stop by the Scrap The Girls blog to see the remainder of the teams amazing creations!!

Until Next time, Happy Scrapping xx

Michelle